How my costing & commercial background helps me manage indie dev
Published on: 06-Sep-2025
Author: Trisect
Estimated read time: 7–9 minutes
I didn’t start as an artist, designer or developer. I started with spreadsheets, budgets, and project costing. That training taught me to translate fuzzy ideas into line items with risks, costs, and expected returns. When I moved into indie game development, that commercial lens didn’t disappear — it became a tool.
This is a practical write-up of the approach I use to keep small-game projects moving: prioritize high-value, low-effort features; treat features as costs you can delay; and validate ideas with short, cheap experiments. I’ll show examples (including a short case study based on a space survivor like game I’m building), templates you can copy, and a simple visual you can use to argue for — or against — features.
TL;DR
- Treat features like budget line items: estimate cost and expected player value before you invest.
- Prioritize quick wins — features that deliver high player value for relatively low development effort.
- Use micro-experiments to validate assumptions fast and cheaply.
- Cut or delay high-cost, low-value items (the vanity features) until the core loop is strong.
1. The core idea: value-per-effort, not excitement-per-effort
As developers we have hobbies inside our gamedev. I love different AI systems and worlds where NPC live their own lives — those are tempting to build. But excitement for building is not the same as impact for the player.
When I look at a list of potential features, I ask one question first: Which of these moves player behavior or delight the most, for the least time? That single reframing (value-per-effort) changes what gets scheduled and what gets pushed to the backlog.
Example: adding a cinematic particle system for explosions might be fun to implement; making the combat feel tighter and more responsive will increase playtime and retention. If the particles cost two weeks and the combat polish two days, the choice is obvious.
2. Features as line items — how costing works in practice
A costing mindset means you estimate each feature along a few dimensions and make decisions with those estimates instead of gut feelings.
For each feature, I track:
- Dev cost (time estimate: days / effort)
- Player impact (1–10 scale: how much it changes core metrics like replayability, engagement, or joy)
- Risk (how unknown or technically risky the feature is)
- Priority (a simple computed value: impact ÷ cost)
I keep the matrix small and quick — estimates, not promises. The purpose is to compare, not to produce a perfect plan.
Quick rules I use
- If
impact ÷ costis high → do it (quick win) - If
impact ÷ costis medium → schedule it (core investment) - If
impact ÷ costis low → delay or cut (vanity / optional)
This forces us to make explicit trade-offs instead of letting the loudest voice in our head (often the most excited voice) decide.
3. The visual tool: Effort vs Effect
A simple scatter plot sells this mindset rapidly: y-axis = Value, x-axis = Effort. The upper-left quadrant (low effort, high value) is where you focus first.
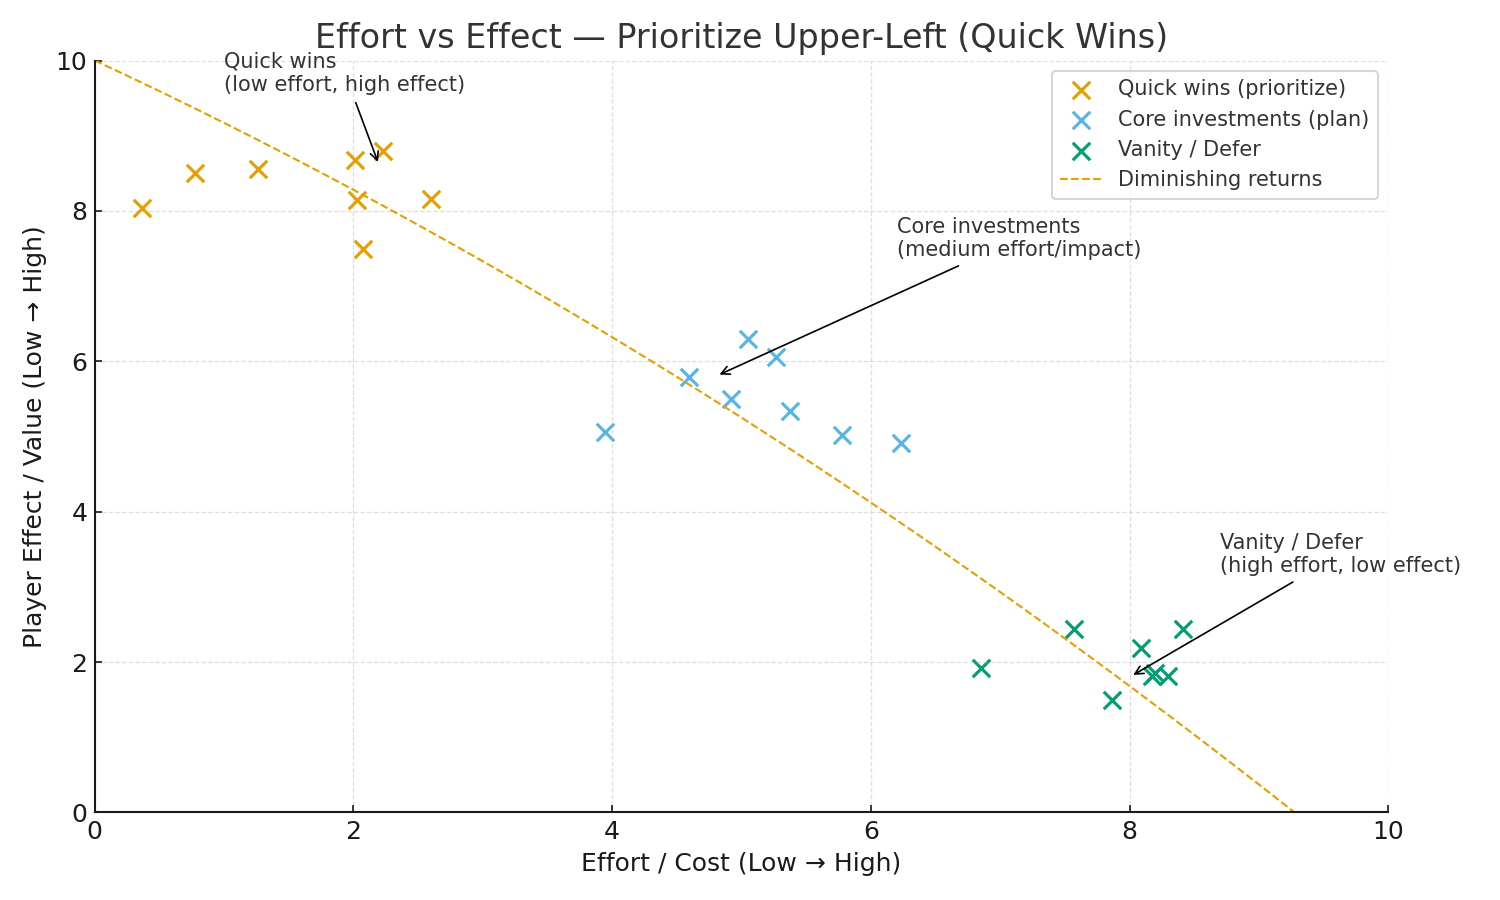
This visual helps say “No” because it externalizes the trade-off into numbers and zones.
4. Small experiments beat big assumptions
Costing reduces waste, but experiments eliminate uncertainty. I prefer the following micro-experiment flow:
- Hypothesis — Define what player problem the feature solves. (“Players will have much better overwiew of the current situation.”)
- Minimum prototype — Build the smallest testable version in 1–3 days.
- Test — yourself, friends, or community.
- Metrics — Track 2–3 simple things (time played, completion rate, subjective rating).
- Decide — Kill / iterate / scale (down/up).
This approach is intentionally conservative: fail cheap, learn fast. If the prototype fails, you saved weeks or months of wasted polish.
5. Case study — applying the method to a space survivor’s game
(Short, practical walk-through using my current project as an example.)
Context
I’m building a space survivr’s game where the player controls a space ship that moves from left to right, progressing through the level. The ship has weapon slots and encounters happen when AI Director chooses so. I am working solo on the project and have limited time.
Feature candidates (real examples)
- Feature A — Weapon type and size system (adds depth and meaning to the combat and progression)
- Feature B — Hit VFX and SFX (helps distinguish between weapons and adds nice touch to each weapon)
- Feature C — Visual representation for each type of weapon (adds nice visual distinction between the weapons)
- Feature D — Complex encounters based on player progression (AI Director reacts better for player progression)
Quick costing & impact estimates (simplified)
| Feature | Effort (days) | Impact (1–10) | Impact/Cost | Quick decision |
|---|---|---|---|---|
| A — Weapon type and size system | 2 | 9 | 4.5 | Do (Quick Win) |
| B — Hit VFX and SFX | 5 | 8 | 1.6 | Do (Core) |
| C — Visual representation for each type of weapon | 20 | 4 | 0.2 | Cut (Vanity) |
| D — Complex encounters based on player progression | 10 | 7 | 0.7 | Delay (Core) |
Action taken: Implemented A first (2 days). Tests showed immediate improvement in combat satisfaction. That validated the investment. B becomes the next planned work after we confirm how impactful the improved combat is. We cut C, if we consider 20 different ships times 3 different sizes times 3 different types of weapons, we get 180 sprites to prepare. Feature D is high effort, high impact feature so we delay it until we complete quick wins.
This is how the costing view turns an argument (“I want pretty turrets”) into a data-driven plan.
6. Templates you can copy
Feature row (CSV-friendly)
Feature,Cost (days),Player impact (1-10),Risk (1-10),Priority (impact/cost),Status,Notes
Weapon type and size system,2,9,2,4.5,Do,"Quick prototype validated"
Hit VFX and SFX,5,8,4,1.6,Do,"Needs design, core system"
Visual representation for each type of weapon,20,4,8,0.2,Kill,"Vanity, a lot of overhead work needed"
Copy into spreadsheet -> text into columns.
Micro-experiment checklist
- Hypothesis — short, measurable.
- Prototype scope — exactly which mechanics and what success looks like.
- Build time limit — 1–3 days preferred.
- Test group size — 2–5 players.
- Metrics — choose 2–3 (time-on-task, subjective rating, completion).
- Decision gate — pass threshold or kill.
7. Common objections & how to counter them
-
“But visuals are what sells!” — True for marketing assets. Separate the question: do you want visuals for marketing or visuals for player experience? If it’s the former, plan a short, targeted marketing polish (2–5 days) rather than a months-long system.
-
“Estimates are wrong.” — They are. The point is not to be perfectly accurate, it’s to compare. Use ranges (S/M/L) when you’re unsure and run an experiment to resolve big uncertainties.
-
“This kills creativity.” — Not at all. It channels creativity toward things that ship and matter to players. Creativity without delivery is just a hobby.
8. How this scales for small teams vs solo devs
-
Solo devs: prioritize ruthlessly. The quick-wins approach is a survival tool. One or two high-impact features will carry a project.
-
Small teams (2–6 people): use the visual and the feature-cost matrix to align priorities. It prevents cargo-cult feature creep by making trade-offs explicit.
-
Larger teams: the same ideas apply but require more formal gating (e.g., a small-cost review board or a product owner who enforces impact/cost rules).
9. Final notes & practical next steps
- Make a quick feature-cost spreadsheet today — 10 minutes.
- Plot 8–12 features on an Effort vs Effect scatter plot.
- Run one 1–3 day micro-experiment this week.
If you do these three things, you’ll notice your backlog slimming down and your playable builds improving faster.
Appendix: Quick example of a sprint-ready feature card
- Feature: Allow player to prioritize enemy types for each weapon.
- Hypothesis: Players will rate combat enjoyment after implementation.
- Prototype: Implement a basic enemy prioritization in 2 days; test with 2-5 players.
- Metrics: subjective combat enjoyment (1–5).
- Decision gate: If enjoyment rises ≥0.5 average points, ship; else iterate or rollback.
🧵 Follow along on X: https://x.com/TrisectDeV
💻 Full source & experiments: https://trisect.dev